Screen recording on a Mac is a useful way to capture and share what’s happening on your screen. Whether you want to create tutorials, record gameplay, or save important video conferences, knowing how to screen record on your Mac is a valuable skill.
Fortunately, there are several methods and software options available for screen recording on Mac. In this easy guide, we’ll explore the different ways you can screen record on your Mac and help you choose the best screen recording software for your needs.
Key Takeaways:
- Screen recording on a Mac allows you to capture and share what’s happening on your screen.
- There are various methods and software options for screen recording on Mac, including the Screenshot toolbar, QuickTime Player, and third-party screen recorders.
- Each screen recording method has its pros and cons, so it’s important to consider your specific needs and preferences.
- The Screenshot toolbar is a built-in feature in macOS, while QuickTime Player is a pre-installed application on Mac.
- Third-party screen recorders offer more advanced features but require downloading additional software.
Using the Screenshot Toolbar
The Screenshot toolbar is a convenient and built-in feature available on macOS Mojave or later. It provides onscreen controls for easy screen recording on your Mac. To access the toolbar, simply press Shift + Command + 5 together.
With the Screenshot toolbar, you have the flexibility to record the entire screen, a selected portion of the screen, or capture still images. This versatile tool allows you to customize your recording settings to suit your needs.
Some of the customizable options include:
- Enabling audio recording for capturing sound during screen recording.
- Showcasing mouse clicks, making it easier for viewers to follow your actions.
- Setting a timer delay before the recording starts, giving you time to prepare.
When you’re ready to start recording, simply click the “Record” button on the Screenshot toolbar. You can also use the Command + Control + Esc shortcut to begin recording.
To stop the recording, click the “Stop” button on the toolbar or use the Command + Control + Esc shortcut. It’s as simple as that!
The Screenshot toolbar is perfect for quick and hassle-free screen recording on your Mac. Whether you’re capturing tutorial videos, creating presentations, or sharing your screen with others, this feature makes the process seamless and efficient.
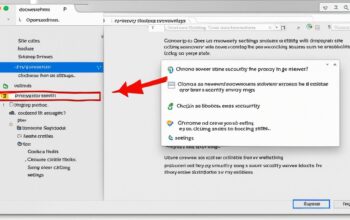
Screenshot Toolbar Interface
Here’s what the Screenshot toolbar interface looks like:
Using QuickTime Player
QuickTime Player is a versatile and professional screen recorder for Mac. With its pre-installed features, it offers a seamless recording experience. Here’s how you can use QuickTime Player for your screen recording needs:
- Open QuickTime Player on your Mac.
- Go to File and select New Screen Recording.
- You’ll see options to choose your audio input and select the portion of the screen you want to record.
- If you want to record the entire screen, click on the respective option. If you prefer to record a selected portion of the screen, choose that option.
- To stop the recording, simply click the Stop button or use the Command + Control + Esc shortcut.
QuickTime Player not only allows you to record your screen effortlessly but also offers additional features such as playback, editing, and sharing capabilities. Its user-friendly interface makes it a top choice among Mac screen recorders.
QuickTime Player Screen Recording Tutorial
If you prefer visual instructions, here’s a step-by-step guide on how to use QuickTime Player for screen recording on your Mac:
- Step 1: Open QuickTime Player.
- Step 2: Click on File in the menu bar.
- Step 3: Choose New Screen Recording.
- Step 4: Customize your audio input and screen recording area according to your preferences.
- Step 5: Start the recording by clicking the Record button.
- Step 6: Stop the recording by clicking the Stop button or using the Command + Control + Esc shortcut.
- Step 7: Save your recording and access additional editing and sharing options.
| Pros | Cons |
|---|---|
| Pre-installed application | Limited features compared to third-party screen recorders |
| Easy to use | Lacks advanced editing options |
| Allows recording of the entire screen or selected portion | Lacks timer settings |
| Additional features like playback, editing, and sharing |
When it comes to Mac screen recording, QuickTime Player is a reliable choice for its ease of use and professional features. While it may have some limitations compared to third-party screen recorders, it offers a convenient solution for capturing your screen on Mac.
Third-Party Screen Recorders
When it comes to screen recording on Mac, there is a wide range of third-party software available that offers advanced features and functionalities. Here are some of the best third-party screen recorders for Mac:
-
OBS Studio
OBS Studio is a highly popular choice among professionals for creating clips and live streaming. It offers advanced video and audio features, allowing you to capture high-quality recordings with ease.
-
Snagit
Snagit is a user-friendly screen recorder that provides a variety of templates and overlay visuals. It’s an excellent choice for creating instructional videos and tutorials.
-
Loom
Loom is a cloud-based screen recorder known for its simplicity and advanced editing features. It allows you to capture and edit recordings effortlessly, making it ideal for quick and easy screen recording.
-
Apowersoft Screen Recorder
Apowersoft Screen Recorder offers high-resolution recordings and a range of editing tools to enhance your screen captures. It’s a comprehensive solution for professional screen recording on Mac.
When choosing a third-party screen recorder for Mac, it is crucial to download from reputable developers and read reviews to ensure performance, security, and privacy. Now, let’s take a look at a comparison table below to help you decide which third-party screen recorder suits your needs best.
| Screen Recorder | Features | Pros | Cons |
|---|---|---|---|
| OBS Studio | Advanced video and audio features | – Highly customizable – Suitable for professional use |
– Steeper learning curve – Requires more system resources |
| Snagit | Templates and overlay visuals | – User-friendly interface – Ideal for instructional videos |
– Limited advanced features – Relatively expensive |
| Loom | Cloud-based recording and advanced editing | – Simple and intuitive – Convenient cloud storage |
– Internet connection required – Limited offline functionality |
| Apowersoft Screen Recorder | High-resolution recordings and editing tools | – Professional-grade features – Robust editing capabilities |
– Lower performance on older Mac models – Limited free version |
Consider your specific requirements and preferences when choosing a third-party screen recorder for Mac. Each option offers unique features and capabilities, so make sure to select the one that best meets your needs.

Screen Recording with Audio
If you want to record your screen with audio on Mac, you have options available in both the Screenshot toolbar and QuickTime Player. In the Screenshot toolbar, before starting the recording, you can select your audio input to ensure sound is captured along with your screen. Similarly, QuickTime Player allows you to choose your audio input when setting up the screen recording.
To record audio on the Screenshot toolbar, follow these steps:
- Open the Screenshot toolbar by pressing Shift + Command + 5.
- Before starting the recording, click on the “Options” button in the toolbar.
- In the “Options” menu, select your desired audio input device.
- Now, start the screen recording by clicking on the “Record” button in the toolbar.
- When you’re finished, click the “Stop” button or use the Command + Control + Esc shortcut to end the recording.
To record audio using QuickTime Player, follow these steps:
- Open QuickTime Player from your Applications folder or Launchpad.
- In the application menu, click on “File” and select “New Screen Recording”.
- Before starting the recording, click on the downward arrow next to the red record button to access the audio input options.
- In the audio input options, choose the desired input source for your audio (e.g., system sound or an external microphone).
- Click the record button to begin screen recording.
- To end the recording, click the stop button in the menu bar or use the Command + Control + Esc shortcut.
Before starting your screen recording with audio, make sure your audio settings are correctly configured, and the selected input device is working properly. Once you’ve ensured the settings, you can start recording and capture both your screen and audio seamlessly.
Pros and Cons of Different Methods
Screen recording on Mac can be done using various methods, each with its own set of pros and cons. Let’s explore the advantages and disadvantages of these different approaches:
Screenshot Toolbar
The Screenshot toolbar is a quick, convenient, and free option for screen recording on Mac. It allows you to capture the entire screen or a selected portion with ease. However, it has limited features and export options compared to other methods. If you’re looking for basic screen recording functionality without the need for advanced editing or customization, the Screenshot toolbar is a great choice.
QuickTime Player
QuickTime Player is a pre-installed application on Mac that offers screen recording capabilities. It is compatible with older macOS versions and provides a simple and straightforward recording process. However, it also has limited features and lacks timer settings, which may be a drawback for users who require more control and customization options.
Third-Party Screen Recorders
Third-party screen recorders offer more advanced features and functionalities compared to the built-in options. These recorders, such as OBS Studio, Snagit, Loom, and Apowersoft Screen Recorder, provide professional-grade video and audio capabilities, advanced editing tools, and a wide range of export options. However, using third-party software requires additional downloads and may have specific system requirements. It’s important to consider factors like performance, security, and privacy risks before choosing a third-party screen recorder.
When selecting a screen recording method on Mac, it’s crucial to consider your specific needs and preferences. Evaluate the pros and cons of each option to determine which one aligns best with your requirements.
| Method | Pros | Cons |
|---|---|---|
| Screenshot Toolbar | – Quick and convenient – Free to use |
– Limited features – Limited export options |
| QuickTime Player | – Pre-installed on Mac – Compatible with older macOS versions |
– Limited features – Lack of timer settings |
| Third-Party Screen Recorders | – Advanced features and functionalities – Professional-grade video and audio capabilities |
– Requires additional downloads – May have specific system requirements |
Conclusion
In conclusion, screen recording on Mac offers a range of methods and software options to suit your specific needs. The Screenshot toolbar, QuickTime Player, and third-party screen recorders each provide different features and capabilities. Whether you’re seeking a quick and easy solution or more advanced editing features, there is a screen recording method that fits your requirements on Mac.
Consider the pros and cons of each method. The Screenshot toolbar is convenient and free, while QuickTime Player is pre-installed and compatible with older macOS versions. Third-party screen recorders offer more advanced features, but require downloading additional software. It’s important to find the method that best aligns with your preferences and requirements.
With these tools, you can effortlessly capture your screen and create professional recordings on your Mac. Whether for educational purposes, tutorial videos, or sharing content with others, screen recording on Mac empowers you to express your ideas effectively. Choose the method that suits you best and start creating compelling screen recordings today.
FAQ
How do I access the Screenshot toolbar on my Mac?
To access the Screenshot toolbar, press Shift + Command + 5 together. This toolbar provides onscreen controls for screen recording on your Mac.
What can I do with the Screenshot toolbar?
The Screenshot toolbar allows you to record the entire screen or a selected portion, capture still images, enable audio recording, show mouse clicks, and set a timer delay.
How do I use QuickTime Player for screen recording on Mac?
Open QuickTime Player, go to File > New Screen Recording. You can select your audio input and choose the portion of the screen you want to record. Click the Stop button or use the Command + Control + Esc shortcut to stop the recording.
Are there any third-party screen recorders available for Mac?
Yes, there are several third-party screen recorders for Mac such as OBS Studio, Snagit, Loom, and Apowersoft Screen Recorder.
Can I record my screen with audio on Mac?
Yes, both the Screenshot toolbar and QuickTime Player offer options for capturing audio during screen recording. You can choose your audio input before starting the recording.
What are the pros and cons of different screen recording methods on Mac?
The Screenshot toolbar is quick and free but has limited features. QuickTime Player is pre-installed, but it also has limited features. Third-party screen recorders offer more advanced features but require additional software and may have system requirements.
How can I summarize the different methods of screen recording on Mac?
You can choose the method that best suits your needs and preferences. Consider the pros and cons of each method, such as ease of use, features, and compatibility with your system.